Tuesday, October 30, 2012

Inspiration

     My mother has always encouraged & inspired me, she really was the greatest mother any girl could ask for. She constantly supported my hyper active creative brain by captivating my mind with endless arts, crafts, puzzles, books and science projects! With out her continuous love and support I most certainly would not be the person I am today!
    Often  times when I was a kid I remember myself whining,
"MOOooommmm, I'mmmmm boOOoored....."
    Her response was always the same, so I've made a quote poster for my quotable Mom! I love you Mom, thank you for always inspiring me!


Monday, October 29, 2012

Monday Morning Manicure

    For the past year or so I've been obsessed with having one finger nail painted a different colour that contrasts or coordinates, the odd one out is usually my pinky or ring finger. I love with this manicure and I'm sure it will look good as almost any color combo.
     I was at my friend's the other day and we showed her mom that we both had our nails painted with one finger a different colour, her mom looked at us like we were crazy. We both giggled and we knew that the trend was clearly awesome and   the fact that she didn't think it was cool made it cooler. 

        In order to create this look I started with two coats of the  colours that I chose to be the base. I waited until the next day to paint the tips because I just don't have the patience to wait for 5 coats to dry.  So the day after I painted my nails with the base colours, I taped off my tips diagonally with some scotch tape, and painted on two coats of black. I then carefully removed the tape  with an up and backwards motion while the nail polish was still quite wet.  After the 2 layers of black dried I applied a layer of top coat to  add shine and to help protect my manicure! I love this look I think this manicure has attitude and personality. It's fun bold colours and it's funky design is full of edginess and energy! 

Thursday, October 25, 2012

DIY: Mini-Sweater T-Skirt

   
    I am happy to tell you all that I  have yet another Emily's T-skirt Tutorial to share with everyone of the inter-webs. This is the first of 3 T-skirts I've made on my up-cycling rampage. For this T-skirt I wanted a comfy skirt, to get stuff done around the house in.

   A couple weeks ago I asked my husband if he was ever going to wear this shirt again, he said
   "No."
So I tossed into the bag with all the other T-shirts that are awaiting for a re-purposed life. I love how soft the sweater like material is, I knew that one day it would become something great!


    The first thing I did to make my new T-skirt, is lop off the sleeves from armpit to armpit in a nice straight line. I kept the top piece that I cut off, I think it could make a cute cropped sweater shrug............


   From there I tried on the tube and measured how short I'd like the skirt to be and folded the waistline hem accordingly, I then hem stitched it almost all the way, leaving a section open to thread the elastic waistband. 


    I then took rubber band and measured a waistband that sat snugly on my hips. 


    I couldn't find a safety pin so I attached a pipe cleaner to the end of the waistband instead  and pushed it through the waist hem by scrunching the fabric like this and then pulling it through.  


 OH, I also attached this little stationary clip to the tail end so it wouldn't pull through while I was threading the waistband. 


   Once I had completed threading the waist band I attached another clip like this (above left pic) and was able to flatten any flips in the waistband without the elastic slipping back inside. Once I was sure the elastic band was nice and flat I sewed the two ends together. (above right pic)


The last step in finishing my T-skirt was to sew the waistband up. In               6 easy steps, and ten minutes of sewing by hand and I have my very first T-Skirt!  Find another T-skirt Tutorial  here.

front
back


-Until next time, stay cool, stay comfortable, stay you!

Wednesday, October 24, 2012

DIY: High-Low T-Skirt

    Now I've totally been obsessed with this trend since it hit the runways spring 2011, but since I have promised myself to remain thrifty, I have not found one that I liked that fit me nicely within my price range. SOOOo to satisify this trend craving I have been having, I have made one, and have decided to share with you all how simple it really is! 
    After this week I don't think my husband will leave me alone with his T-shirts. This is my 3rd skirt in less than 24 hours, I've been on an "up-cycling" kick since yesterday, and it just has not stopped.
This is how I did it, I found an old black L-sized t-shirt kicking around. Any size will do as long as you can fit your widest part into it's widest part, the T-skirt will work!

    I know amazing right, free skirt from old men's shirt, yay T-SKIRT. :) I dunno what struck me yesterday, but I had a Eureka moment. 


    Next I snipped open the top so I could jump inside! 


    Once inside I was able to pin the shirt snugly around my curves. Make sure your t-shirt material has a nice stretch to it, this way you won't need a zipper to get in and out of it! 
I then sewed  up one side then tried it on, I would have re-pined if necessary I didn't, so I sewed up the other side.  Now just a note here, I am currently without a sewing machine, so this step would normally take about 2 minutes on a machine, but took me by hand about 15 minutes a side to double stitch. I chose to double stitch because I wanted the material to be snug and with a double stitch I am given the security that my butt's not about to rip out of my handmade t-skirt.


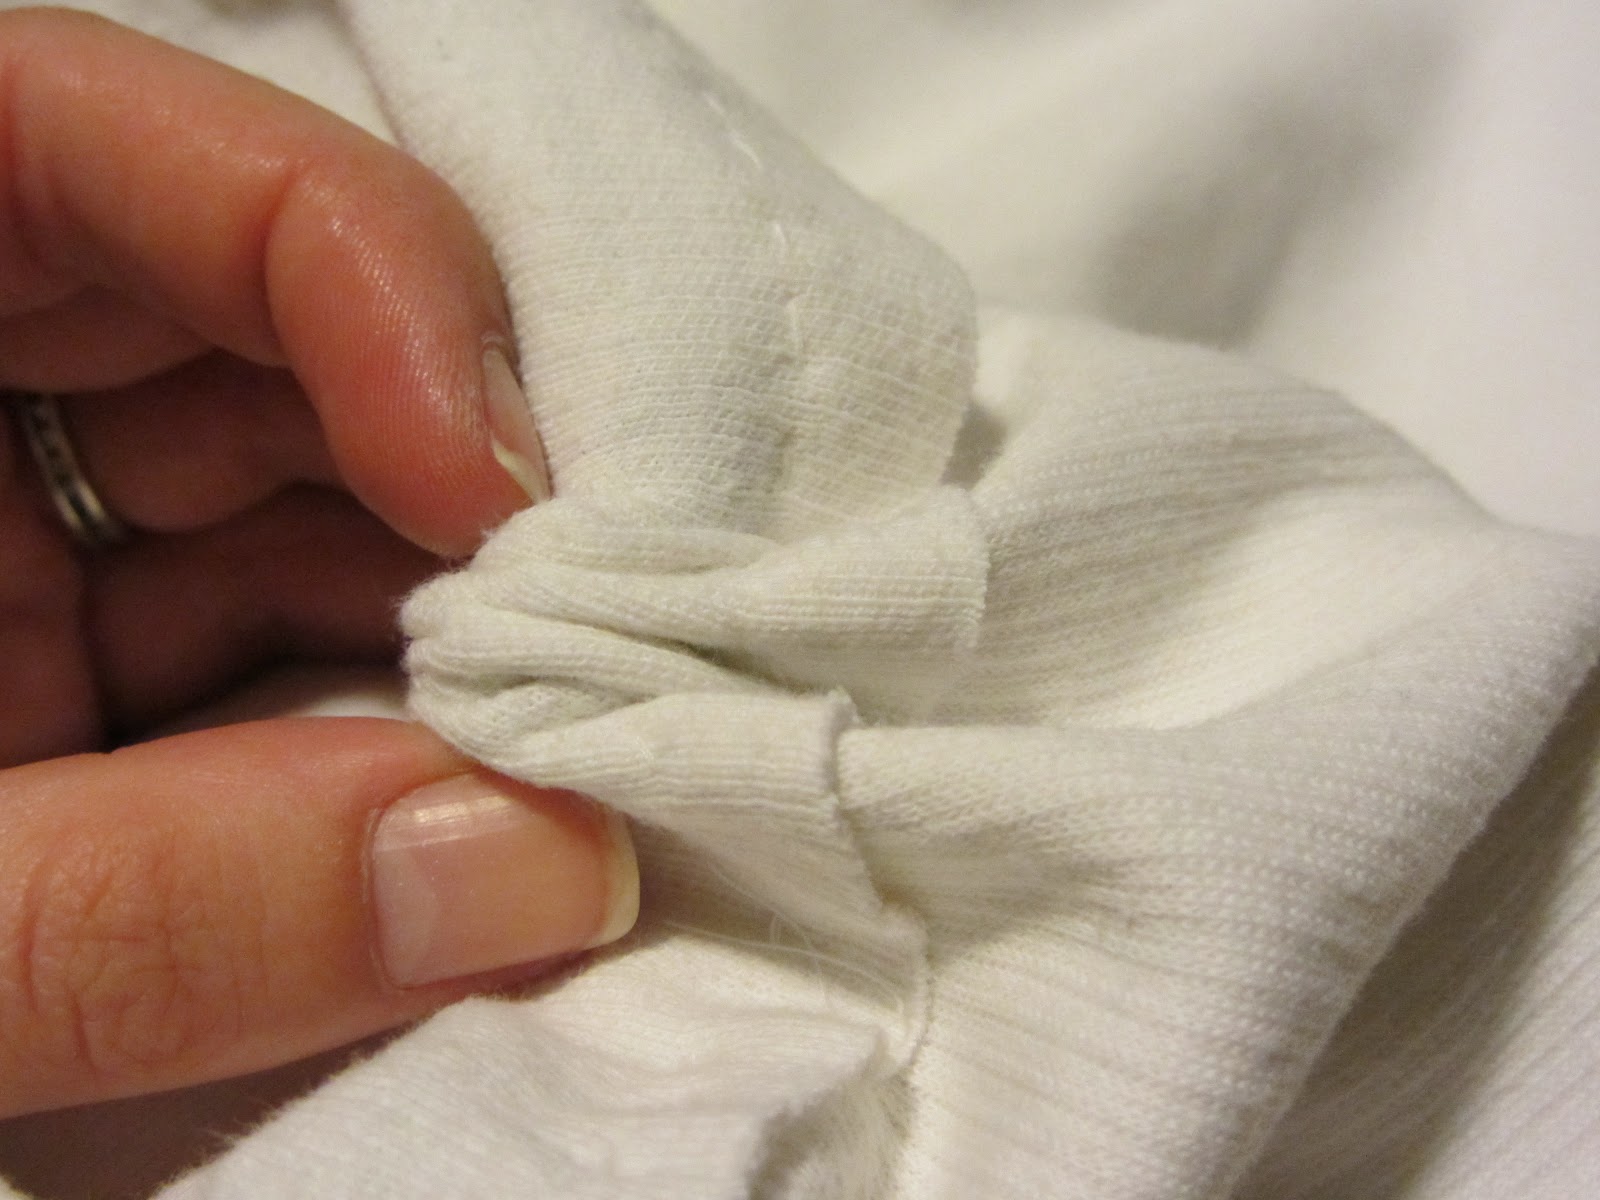
     I am doing it all by hand so I choose to "lighting stitch" where I thread 6 - 12 stitches in the time I would do one or two normal ones. Lightening stitch also helps me sew in straight lines which can be hard free handed.  The pic below is an example of lightening stitch. I lightening stitched the hem stitch.... not necessarily a good idea, but fast. The hem stitch came out okay, not my best by any means, but it works.... it's a free t-skirt!


  Trim off the extras, I leave about 2-3cm edge from the seam.


    I put the skirt back on and fold down the top to make the waistline hem and I pinned it into place. I used a hem stitch for the top so the stitched won't be visible from the other side. I didn't sew the waist line shut, I left it open so I could thread through an elastic waist band. 

 I cut an elastic waist band and was generous with the measurement. I attached a safety pin, so I could easily push it through the waist hem.


 Once all the way through I attached clips so they wouldn't slip through while I smoothed out any flips in the band. 


    I then put a clippy like this, and tried the skirt back on to make sure that the waist band was at the right amount of tension, then re clipped, removed skirt, sewed the band together, closed the whole and trimmed loose threads. 


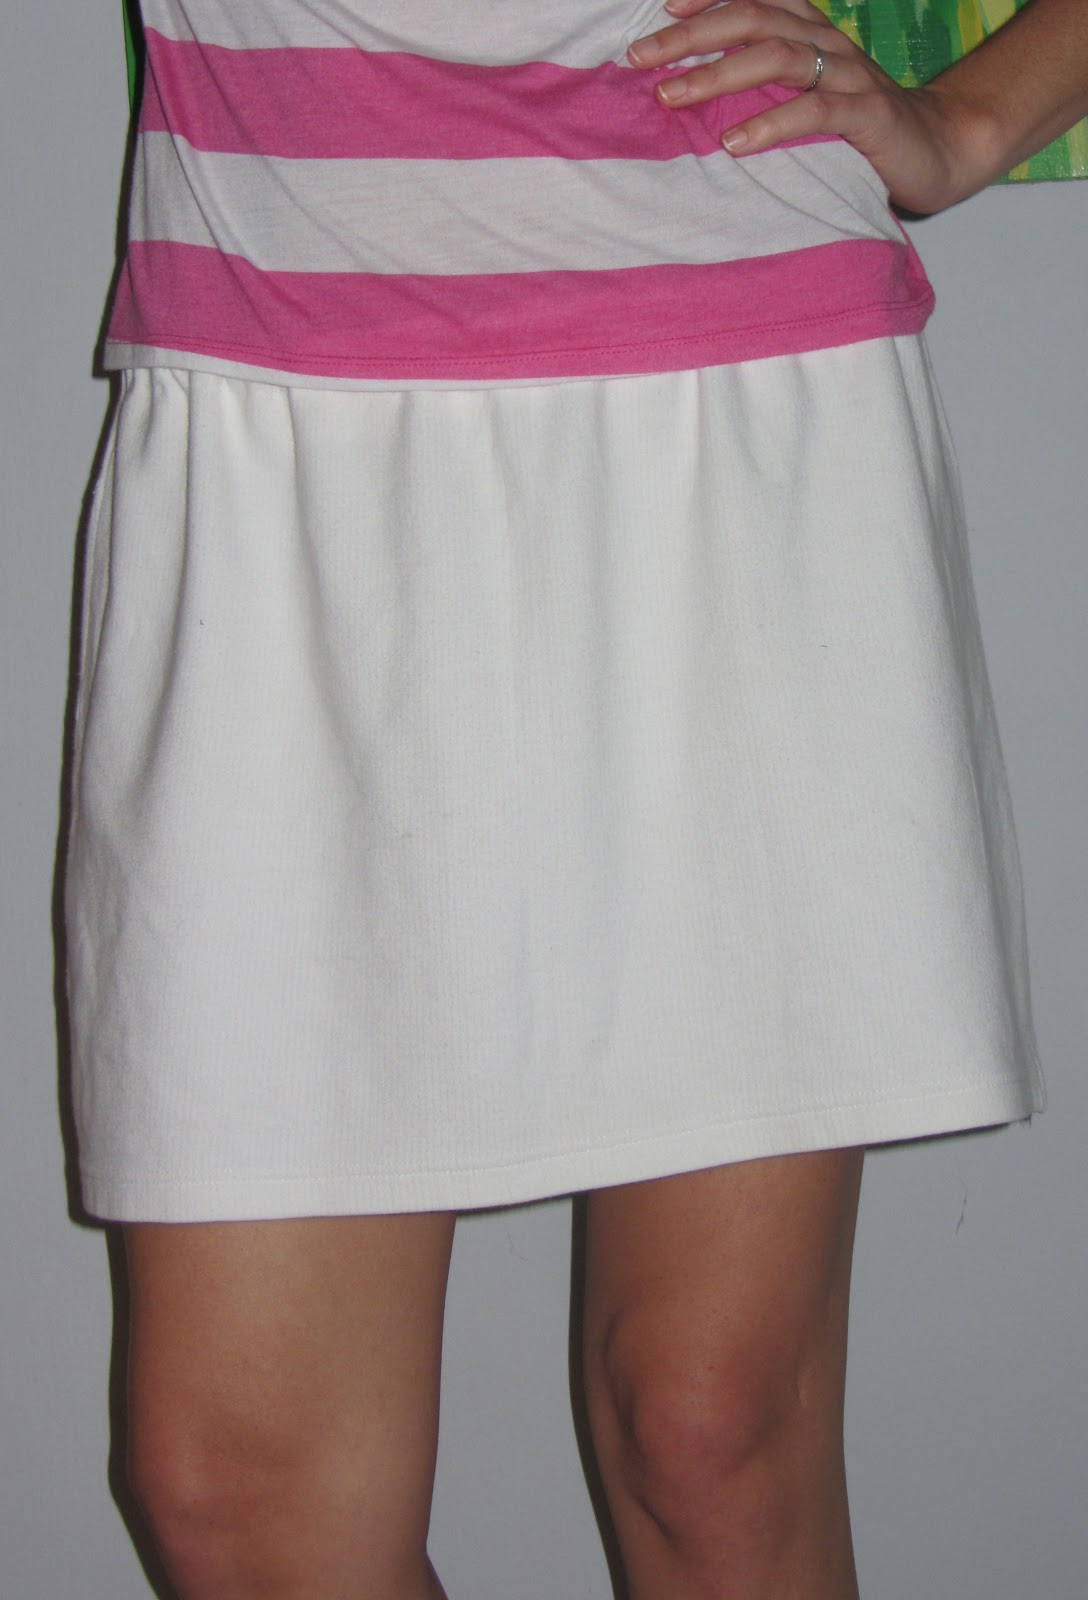
    I then trimmed like so in a stretched out "S" pattern, and Ta-da I have my very own High-Low, Mullet T-skirt! 


Tuesday, October 23, 2012

Monday Morning Manicure Madness

Good Morning and A happy Tuesday to you! I know I missed Monday by a day, but ohhhh well it's been a rough week, I had to see my husband off to the army. This morning's manicure is with one of my favourite polishes, it's a beautiful holographic paint with what I would like to nano-sparkles. These nano-sparkles bring to life the rainbow effect! I applied to different stamping patterns that had similar lines.


Thursday, October 4, 2012

Mediterranean Dressing

         If you know me you'll know that I'm dress obsessed, and since I moved to Israel, I've actually ended up wearing less  dresses than I used to.... Israel is an extreamely casual country, I mean I'm sitting here (right now) in a professional, respectable workplace, and there are women walking around in tube tops, beach covers, haviannas, jeans, hot shorts and mini skirts. I know this attire would never fly in any workplace in Canada except maybe inside a strip club. But I mean there are some justifications, it is a hundred million degrees outside, and wearing anything but flip flops right now is close to insane but there is just a level of professionalism that you grow to expect from a bussiness place. Sooooo needless to say that people here regularly dress like they are at the beach weather they are or not.   

   Dressess are usually reserved for the religious, unless they are  extremely revealing and I actually dispise wearing revealing dresses. I have however finally decided that I no longer care about the religious stigma that comes with wearing a dress, in this country.  I will wear them and love them and look fashionable not religious while doing so. Soooo since I've decided to wear my old dresses in a new way, I had to find some fun fresh new ways to wear them!!


    This white linen dress is sooo comfortable, it's light weight, white and breathable, aka. perfect for the sub-tropic sunshine. You would think that the beautiful people of the Mediterranean would want to dress like they lived on the Mediterranean Right?? 


     What do you think of when you hear Mediterranean Style? I think of sunshine, the French riviera, Casablanca, Greek Islands, Blue and White, delicious coffee, amazing perfumes, museums, historic art, statues,  Italy, turquoise waters, terra cotta tiled roofs, sunsets, and sailboats, Ancient Ruins, and Roman Aquaducts. So I imagine Mediterranean Fashion to be just as grand as all the antiquities, to me this spells high fashion, living and loving!


    I have tried to capture the essence of the Mediterranean in the outfits I have created with my dresses.  Which to me is a romantic, rich look that spells out class and individuality. 


     The look below is a fashion fusion combining the cowgirl boots with    an ultra feminine outfit creates attitude and individuality in this look that might have been to blah with out some sweet kicks! 


- Until next time, stay cool, stay comfortable, stay YOU! 

Monday, October 1, 2012

Monday Morning Manicure Madness

       Wow it's October already!  Today for the first time since April it rained here in the sunny city of Ra'anana. The first few showers of fall are always so refreshing, I cannot even imagine how happy all the trees and plants must be, but you can almost hear them singing! The first rains always happen after Rosh Ha Shana (the new year) around Sukkot and they work in an almost spiritual way, cleansing the country from the dry dust and  blistering heat.  Preparing the country for a fresh clean start for the new year. After about five months with out rain, seeing it the first few times always makes me smile.
      This morning's manicure is a stamp combination that I call the romance design. I recently bought a beautiful dusty rose colour so it was actually the colours that inspired the stamp combination.  The look turned out to be feminine, soft and romantic. I think it's one of my favourite manicures so far!

- Until next time, stay cool, stay comfortable, stay YOU!